

So, you've seen those candles with more than one wick and thought, "Wait, how did they decide where to put those wicks and how many to use?" Buckle up, because we're about to demystify this multi-wick madness.
First things first, the goal here is to make your candle burn like a pro – none of that tunnelling nonsense. It's all about getting the best wick-to-wax action. You see, bigger candles need more wicks to perform their wax-melting dance. Why? Because a single wick can only handle so much wax. And a tunnel/ing candle? That's like inviting guests to a party and not letting them in.
Now, two or three wicks aren't just about making your candle look fancy – they're like the bodyguards of your candle's performance. They reduce soot, mushrooming, and give you a better hot throw (that's the scent, by the way).
Imagine a carbon ball forming on top of your wick because it's drowning in wax. That ball throws a sooty party and ruins the whole candle vibe. No one likes a soot party crasher.

Let’s explore this!
The goal in candle making is always to make your candle burn more efficiently. This means achieving the best wick to wax distribution. The bigger the size a candle is, the more wicks it needs to perform! Why? Because a single wick can only melt so much wax. And watching your beautiful candle form a tunnel because the flame doesn't melt enough wax, and the melted wax (a.k.a wax pool) does not extend all the way to the rim can be infuriating.
Adding two or three wicks changes the aesthetics and reduces the likelihood of soot development, mushrooming of the wick and reduced hot throw.
Think of it this way: a carbon ball can form at the top of your wick as a result of choosing a single wick which has too much wax to cover. This ball causes increased temperature which manifests as soot and smoke and mushrooming. This decreases the candle scent.
What wick size will you choose?
Alright, let's talk wick size. The diameter of your vessel is the key player here. Our wick guide is your buddy, but testing is like the VIP pass. If your vessel's diameter is over 10 centimeters, a single wick might not cut it. So, let's do some math: D (diameter) / NW (number of wicks) + 0.5cm = your wick size. If your vessel is 7cm in diameter and you want 2 wicks, it's 7 / 2 + 0.5cm = 4. Got it? Good.
Now, where do those wicks go? Think spacing – too close, and you've got a too-hot flame party. Not good. They need breathing room and an even placement. Round vessels are wick-friendly, like a wick paradise. You can try a triangle of three wicks or two side by side – just give 'em space.
Here's the candle-making mantra: test, test, and test some more. Your first tries might not be Grammy-worthy, but practice makes the perfect candle. So what if your first multi-wick masterpiece didn't quite make it to the rim? Failure is just another step on the path to candle glory.
And remember, there's no strict rule here – it's your candle kingdom. So, go ahead, light up your multi-wick creation and share it with the world. It's like art, but with flames and wax. Who said candle making wasn't an adventure?
Where exactly do I place the wicks in my jar?
Choice of placement is crucial. If your wicks are squashed together, the flame may burn too hot, which would reduce the hot throw. It is important to space the wicks equally and not too close to the edge of your vessel. Always use wicks that are the same size to achieve an even burn. You can also make wick placement templates for replication.
So, how many wicks then?
Think of it this way: (and then do your own testing)
Your vessel has an inner diameter of over 7.5cm. Go for a single wick!
Got a diameter over 7.5cm but under 10cm? Time to double wick!
And if your diameter over 10cm but is under 12cm, triple wick !

What about vessel shape?
Round vessels are far easier to multi wick than square vessels.
With a round vessel, use a triangular formation of three wicks in the centre with a gap of 2.5 cm, or two wicks side by side but with a similar gap.
Give it a go!
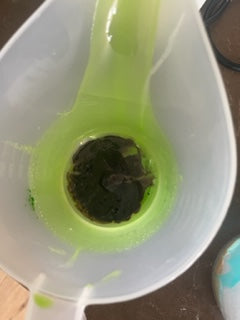
It's not easy, but remember that practice makes perfect. Below you can see that the two selected wicks were not correct - because the melt pool stopped before reaching the edge of the vessel. The same occurred with the choice of 3 wicks.


There may be a few fails before the successes. That's the joy of candle making! Don't give up.
Ultimately, there is no hard and fast rule here, so you will need to test, test, then test again! Then post your multi wicked candle so we can see too!
Leave a comment
All comments are moderated before being published.
This site is protected by hCaptcha and the hCaptcha Privacy Policy and Terms of Service apply.