Imagine the chaos in your kitchen as you scramble to open windows and doors, trying to let out that overwhelming stench.
What's the source of this olfactory nightmare? Well, you've somehow managed to turn a simple melt and pour soap-making session into a microwave disaster!
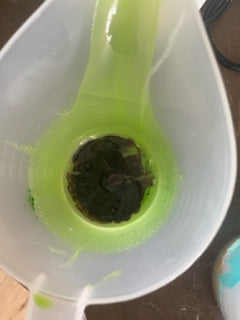
The soap you were innocently melting has turned into a boiling cauldron of trouble. It's not just bubbling; it's bubbling with vengeance, burning a hole through the once-intact bottom of your microwaveable jug. The result? A gooey, brown mess that's now dripping onto the turntable. In a fit of frustration, you toss the jug of misery into the sink, where it disgorges its molten contents. You hold your breath, trying to avoid the acrid blend of melted plastic and singed soap fumes. It's a heartbreaking sight – especially since just moments ago, you were carefully chopping your soap into neat little chunks, eagerly preparing for a creative soap-making session.
It's a soap-making tragedy of Shakespearean proportions!

Temperature & Technique
So, you ventured into melt and pour soap making, excited about the prospect of creating beautiful bars without the lye-related drama. After all, the soap base you're using has already undergone the soap-making process. But, don't be fooled – there's technique involved even in this "entry-level" soap crafting. And here's a secret: the right temperature can make all the difference. Unfortunately, it's also remarkably easy to turn your soap base into a sizzling mess if you let your attention wander.
Slowly and Evenly Is Your Mantra
-
Check what the soap base manufacturer suggests for melt temperature. Take the Stephenson Crystal RC soap base as an example – it's best melted at a cozy 55 - 60°C.
-
Keep a trusty thermometer close by – it's your soap's temperature guardian.
-
Uniformity is key: cut your soap base into evenly-sized chunks. Think of it as orchestrating a symphony, where every note has to harmonize just right.
-
The microwave is your ally in melting soap, but it comes with its own set of rules. Those ten-second bursts of heat are like soap-saving magic spells. Forget about saucepans – they're the villains that can ruin your soap. A double boiler or even an oil fryer (with temperature controls) can be your sidekick. Stirring is the unsung hero – do it every 30 to 60 seconds.
Patience Is Your Superpower – No Wandering Allowed!
Remember, patience is your secret weapon. Don't even think about leaving the scene – you'll be orchestrating a start-and-stop ballet with the microwave while stirring like a soap-making maestro. Trust us, after tangling with burnt melt and pour soap, you'll think twice before dancing with that fiery mishap again.

Happy Soap Crafting!


Leave a comment
All comments are moderated before being published.
This site is protected by hCaptcha and the hCaptcha Privacy Policy and Terms of Service apply.